:Tips ListView を使おう 〜 基礎編 〜 その3
SimpleAdapter
SimpleAdapter クラスは、 ListView に表示されるアイテム( レイアウトリソースの情報から生成された View )内の ”複数の指定された View に対してテキストや画像などをバインドする” ために用いられる Adapter です。
Class Overview
XML ファイルで定義された複数のビューに対し、データをマッピングする簡単なアダプターです。リストビューの保存データとして、 Map 要素の ArrayList を指定できます。ArrayList 内の各エントリー(Map)はリストビューの行に対応します。それらの Map には(それらに対応する)行のデータが含まれます。また、行の表示に用いられるビューを定義した XML ファイルを指定します。そして、 Map のキーから特定のビューへのマッピングも指定します。データのビューへのバインドは、2つのフェーズで行われます。もし SimpleAdapter.ViewBinder が利用可能な状態であれば、最初に setViewValue(android.view.View, Object, String) メソッドが呼び出されます。そして、そのメソッドの戻り値が true の場合は、データのバインドが行われたことを意味します。もし、戻り値が false の場合は、続いて以下のビューが順に試されていきます。
- このビューが Checkable を実装しているクラス(例えば CheckBox クラス)の場合、望まれるバインド値は boolean です。
- このビューが TextView の場合、望まれるバインド値は文字列です。そして setViewText(TextView, String) メソッドが呼ばれます。
- このビューが ImageView の場合、望まれるバインド値はリソースID、または(リソースIDの)文字列表現です。そして setViewImage(ImageView, int) または setViewImage(ImageView, String) がメソッド呼ばれます。
最終的に適切なバインド候補が見つからなかった場合には IllegalStateException がスローされます。
注) 勝手にリファレンスを翻訳(意訳)してみました。英語は苦手なので適当です。間違えてる場合はごめんなさい。

SimpleAdapter を用いた ListView 作成のポイント
ステップごとに作成のポイントをみていきます。
< STEP 1 > データを作成する
バインドする個別の値は Map に格納する
List<? extends Map<String, ?>> data
前回 取り上げた ArrayAdapter と同様、 SimpleAdapter もデータを List インターフェイス実装クラスのインスタンスとして受け取ります。しかし、 SimpleAdapter は ArrayAdapter とは異なり、複数の View に対して値をバインドする必要があるため、 「キー ( Key )」 を String 型 とする Map インスタンスをアイテム(行)の数だけ作らなければなりません。そして、その Map に個別の値を格納し、最後に List インスタンスにその Map を格納する、という手順を踏みます。
・ SimpleAdapter のデータ構成図

上図の Object が「値」になります。 Map に Object を Map#put() で格納し、List に Map を List#add() で格納します。
// 例

Integer img1 = R.drawable.image1;
String msg1 = "Message 1";

Map<String, Object> map1 = new HashMap<String, Object>();
map1.put("image", img1);
map1.put("message", msg1);

Integer img2 = R.drawable.image2;
String msg2 = "Message 2";

Map<String, Object> map2 = new HashMap<String, Object>();
map2.put("image", img2);
map2.put("message", msg2);

List<Map<String, Object>> list = new ArrayList<Map<String, Object>>();
list.add(map1);
list.add(map2);
このサンプルでは Integer 型の値1つと String 型の値1つを Map に格納しています。よって Map の値部分のジェネリックの型は、 Integer と String の共通の親クラス Object 型になります。

サンプルのデータ構成図はこうなります。
アイテム(行)内の ImageView に画像を表示する際の「 値 」は?
残念ながらデフォルトでは Drawable インスタンスを値として用いるような機能はありません (恐らくはメモリの節約の為でしょう) 。よって、画像への参照 ( URI 又はリソースのID ) を値に用いて ImageView に表示させることになります。大枠としては、値が Integer 型の場合には ImageView#setImageResource() メソッドが呼ばれ、 String 型の場合には ImageView#setImageURI() メソッドが呼ばれる、と理解しておけば良いと思います。以下に、画像の配置場所(参照先)毎のそれぞれのコーディング例を示します。
apk 内のリソースファイルの場合・・・
・画像のリソースID( R.drawable.* ) を Integer 型のオブジェクトとして Map にセットする。
// 例

Map<String, Object> map = new HashMap<String, Object>();
map.put("image", R.drawable,icon);
他にも String 型として "android.resource://" + getPackageName() + "/" + R.drawable.*; なんて書き方もあるようです。使いどころが不明ですが・・・
システムのリソースファイルの場合・・・
・画像のシステムリソースID ( android.R.drawable.* ) を Integer 型のオブジェクトとして Map にセットする。
// 例

Map<String, Object> map = new HashMap<String, Object>();
map.put("image", android.R.drawable.ic_menu_camera);
内部ストレージ ( ローカル ) に配置された画像ファイルの場合・・・
・画像ファイルへの絶対パス ( /data/data/<パッケージ名>/<ファイル名> ) を String 型のオブジェクトとして Map にセットする。
// 例  /data/data/<packageName>/files/ に hoge.png ファイルを配置している場合

Map<String, Object> map = new HashMap<String, Object>();
map.put("image", getFileStreamPath("hoge.png").getPath());
注)ContextWrapper#openOutputStream() を使ってローカルにファイルを書き出した場合は、 /data/data/
外部ストレージ ( SD カード ) に配置された画像ファイルの場合・・・
・画像ファイルへの絶対パス ( /mnt/sdcard/<ファイル名> ) を String 型のオブジェクトとして Map にセットする。
// 例  /mnt/sdcard/ に hoge.png ファイルを配置している場合

Map<String, Object> map = new HashMap<String, Object>();
map.put("image", Environment.getExternalStorageDirectory().getPath() + "/hoge.png");
このほかにも異なるアプリケーション(例えば搭載カメラ)の保持している画像を使うといった方法もあるようですが、未だ試していないので分かりません。
Checkable インターフェイス実装クラスの View には Boolean 型
SimpleAdapter は Checkable インターフェイス実装クラス ( CheckBox, CheckedTextView, CompoundButton, RadioButton, ToggleButton ) も標準でデータの値をバインドできるようになっています。バインド出来る値は Boolean.TRUE または、 Boolean.FALSE のいずれかです[1]。
< STEP 2 > レイアウト情報を作成する
データの値をバインドできる View は基本的に3種類
アイテム内にレイアウトできる View の種類に制限はありません。しかし、データの値をバインド出来る View となると「 基本的 」 に3種類だけです (拡張機能については SimpleAdapter.ViewBinder の項で説明します)。具体的には、 Checkable インターフェイス実装の View 、 TextView ( または、 TextView 継承クラス ) 、ImageView (または、 ImageView 継承クラス)、のいずれかです。
Known Direct SubclassesKnown Indirect Subclasses
Checkable と TextView で重複している場合、 Checkable#setChecked() で Boolean 型の値だけがバインドできます[1]。テキストもバインドしたい場合には多少の工夫が必要です (方法については SimpleAdapter.ViewBinder の項で説明します)。
データの値をバインドする全ての View に参照用のIDを割り当てておく
SimpleAdapter の場合、1つの TextView のみにIDを割り当てましたが、 SimpleAdapter は、データの値をバインドする View 全てに参照用のIDを割り当てる必要があります。
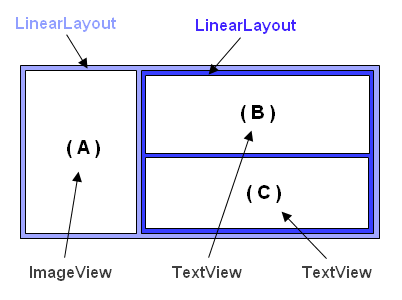
例えば、下図のようなアイテムのレイアウトを考えたとします。
・アイテムのレイアウト図

データの値をバインドしたい View が ( A ) と ( C ) であれば・・・
/res/layout/layout.xml
<?xml version="1.0" encoding="utf-8"?>
<LinearLayout
  xmlns:android="http://schemas.android.com/apk/res/android"
  android:orientation="horizontal"
  android:layout_width="fill_parent"
  android:layout_height="wrap_content"
  >
 <ImageView
   android:id="@+id/imageview"
   android:layout_width="wrap_content"
   android:layout_height="wrap_content"
   />
 <LinearLayout
   android:orientation="vertical"
   android:layout_width="fill_parent"
   android:layout_height="wrap_content"
   >
   <TextView
     android:layout_width="fill_parent"
     android:layout_height="wrap_content"
     android:text="固定値"
     />
   <TextView
     android:id="@+id/textview"
     android:layout_width="fill_parent"
     android:layout_height="wrap_content"
     />
   </LinearLayout>
</LinearLayout>
といったようにレイアウト情報の XML ファイル上で参照用のID ( R.id.* ) を割り当てて ( android:id="@+id/*" ) おきます。
< STEP 3 > Adapter を作成する
SimpleAdapter のコンストラクタ
「:Tips ListView を使おう 〜 基礎編 〜 その1」( 参照 )でも触れましたが、 SimpleAdapter のコンストラクタは下記の1つだけです。
Summary
Public Constructors SimpleAdapter (Context context, List<? extends Map<String, ?>> data, int resource, String from, int to) 第2引数の data には < STEP 1 > で作成したデータ ( List インターフェイスのインスタンス ) を。第3引数の resource には < STEP 2 > で作成したレイアウト情報の XML リソースファイルのID ( R.layout.* ) を渡します。第4引数の from には < STEP 1 > で Map オブジェクトの「キー ( Key )」として用いた全ての文字列 ( String 型 ) を配列に格納して、渡します。第5引数の to には < STEP 2 > で割り当てた View 参照用のIDを配列に格納して、渡します。第4引数と第5引数の配列についてですが、この2つの配列には相関関係があるので、要素を配列に格納する際には少々注意が必要です。
SimpleAdapter では 「 配列 from の要素 from[x] の文字列を Key にして、データの Map から 「 値 ( Value ) 」 を取り出し、配列 to の要素 to[x] のIDが示す View にその値をバインドする 」 という処理を配列の要素の数だけ繰り返します。ですので、格納する順序は気にしなくても構いませんが、相関する from の要素と to の要素の配列のインデックス(添え字)を同一にするということは守らねばなりません。
// 例

Map<String, Object> map1 = new HashMap<String, Object>();
map1.put("image", R.drawable.image1);
map1.put("message", "Message 1");

Map<String, Object> map2 = new HashMap<String, Object>();
map2.put("image", R.drawable.image2);
map2.put("message", "Message 2");

List<Map<String, Object>> data = new ArrayList<Map<String, Object>>();
data.add(map1);
data.add(map2);

String[] from = {"image", "message"};
int[] to = {R.id.imageview, R.id.textview};

SimpleAdapter adapter = new SimpleAdapter(this, data, R.layout.layout, from, to);
< STEP 4 > ListView を作成する
特に何もありません。 ArrayAdapter の回の < STEP 4 > を参照してください。
SimpleAdapter.ViewBinder
SimpleAdapter の機能を拡張する
多機能な SimpleAdapter ではありますが、デフォルトでは実現できない事もあります。例えば、サポートされている3種類以外の View にも値をバインドしたい場合や、 CheckBox や RadioButton などに Boolean 以外のデータ(例えばテキストなどの値)をバインドしたい[1]、といったケースなどがそれに当たります。もちろん SimpleAdapter を継承した独自クラスを作り機能を追加するといったやり方もありますが、それよりもっと簡単にそれらを実現する手段があります。それが SimpleAdapter.ViewBinder インターフェイスを使った機能の拡張です。このインターフェイスを実装し SimpleAdapter にセットすることで、 Clickable、TextView、ImageView 以外の View クラスでも値がバインド出来るようになりますし、また、データ要素の Map に収める値の型にも制限がなくなります。そして、もし必要があるのならば同一の View に対し複数の値をバインドすることも可能になります。
Class Overview
このクラスは、ビューに値をバインドさせる SimpleAdapter の外部クライアントとして使えます。SimpleAdapter で直接サポートされていないビューに値をバインドさせたり、SimpleAdapter でサポートされている方法とは違った方法でビューにバインドを行う場合はこのクラスを使用してください。
Summary
Public Methods abstruct boolean setViewValue(View view, Object data, String textRepresentation) このインターフェイスに定義されている抽象メソッドは setViewValue() の1つだけです。第1引数の view は SimpleAdapter のコンストラクタで第5引数として渡した参照用IDが指す View のインスタンスです。第2引数の data は第1引数の View にバインドすべき値です。第3引数の textRepresentation は第2引数の文字列表現(単なる data.toString() の戻り値)になっています。このメソッドを実装したクラスを SimpleAdapter にセットすると SimpleAdapter の bindView() 内で、データを View にバインドする必要がある度に繰り返し呼び出されます。
SimpleAdapter.java # bindView()
private void bindView(int position, View view) {
    final Map dataSet = mData.get(position);
    if (dataSet == null) {
        return;
    }
    final ViewBinder binder = mViewBinder;
    final View[] holder = mHolders.get(view);
    final String[] from = mFrom;
    final int[] to = mTo;
    final int count = to.length;

    for (int i = 0; i < count; i++) {
        final View v = holder[i];
        if (v != null) {
            final Object data = dataSet.get(from[i]);
            String text = data == null ? "" : data.toString();
            if (text == null) {
                text = "";
            }

            boolean bound = false;
            if (binder != null) {
                bound = binder.setViewValue(v, data, text);
            }

            if (!bound) {
                if (v instanceof Checkable) {
                    if (data instanceof Boolean) {
                        ((Checkable) v).setChecked((Boolean) data);
                    } else {
                        throw new IllegalStateException(v.getClass().getName() +
                               " should be bound to a Boolean, not a " + data.getClass());
                    }
                } else if (v instanceof TextView) {
                    // Note: keep the instanceof TextView check at the bottom of these
                    // ifs since a lot of views are TextViews (e.g. CheckBoxes).
                    setViewText((TextView) v, text);
                } else if (v instanceof ImageView) {
                    if (data instanceof Integer) {
                        setViewImage((ImageView) v, (Integer) data);
                    } else {
                        setViewImage((ImageView) v, text);
                    }
                } else {
                    throw new IllegalStateException(v.getClass().getName() + " is not a " +
                            " view that can be bounds by this SimpleAdapter");
                }
            }
        }
    }
}
・後述しますが、この bindView() メソッドには「バージョン間の差異に起因する問題」が存在します。このソースコードを「参考」にはしても「前提」にはプログラムをしないで下さい。
上のソースコードは、実際の SimpleAdapter の bindView() メソッドのソースコードです( Android 2.1 API Level 7 )。最初に SimpleAdapter.ViewBinder のインスタンス binder が null かどうかを判定し、null でなければ setViewValues() を呼び出しています。そして次に、メソッドの戻り値 bound が true の場合は以後の処理は行わず、 false の場合は通常のバインド処理を行っています。ここで重要なことは setViewValue() メソッドの戻り値で false を返すと通常の処理も実行されてしまうということです。特に理由がない限りは setViewValues() で値をバインドしたら必ず true を返すようにしてください。
具体的な setViewValues() メソッドの実装方法
これも上記の実際のソースコードが参考になります。以下ソースコードからの抜粋。
if (v instanceof Checkable) {
    if (data instanceof Boolean) {
        ((Checkable) v).setChecked((Boolean) data);
    } else {
        throw new IllegalStateException(v.getClass().getName() +
           " should be bound to a Boolean, not a " + data.getClass());
    }
}
通常のバインド処理を行っている部分です。まず instanceof 演算子で View の種類を判定しています。次に再度 instanceof 演算子を用いてバインドする値の型を判定しています。上記のコードでしたら「 Checkable インターフェイス実装の View で、値が Boolean 型である」場合は、Checkable#setChecked() を呼び出す、という処理の流れになっています。そして、View の種類と値の型が不一致の場合には IllegalStateException がスローされます。私たちがオリジナルの setViewValues() メソッドの実装を行う場合にも、上と同様の処理手順を踏めば問題ありません。
それでは具体的に「同一の View (CheckBox) にテキストとブール値の2つの値をバインドする」ための setViewValues() 実装例をみてみます。
public boolean setViewValue(View view, Object data, String textRepresentation){
    if (view instanceof CheckBox) {
        if (data instanceof Boolean) {
            ((Checkable) view).setChecked((Boolean) data);
            return true;
        } else if (data instanceof CharSequence){
            ((TextView) view).setText((CharSequence) data);
            return true;
        } else {
            throw new IllegalStateException(view.getClass().getName() +
                           " should be bound to a Boolean or CharSequence," +
                           " not a " +  data.getClass());
        }
    }
    return false;
}
最初に View の型を判定しています。型が CheckBox ならば次に値の判定をします。値が Boolean 型ならば view を Checkable にキャストして setChecked() メソッドを呼び出し、 CharSequence 型ならば TextView にキャストして setText() メソッドを呼び出しています。そしてバインドが行なわれたならば戻り値に true を返し、バインドが行われなければ false を返しています。また、今回のように同一の View に複数の値をバインドする場合には、 SimpleAdapter のコンストラクタ第5引数 to には同じ参照用IDを指定します。
SimpleAdapter に SimpleAdapter.ViewBinder をセットする
Summary
Public Methods void setViewBinder(SimpleAdapter.ViewBinder viewBinder) SimpleAdapter に SimpleAdaper.ViewBinder をセットするには setViewBinder() メソッドを使います。引数は ViewBinder のインスタンスです。大半のケースでは下記のように無名インナークラスとして定義する形になると思います。
SimpleAdapter adapter = new SimpleAdapter(this, data, R.layout.layout, from, to);

adapter.setViewBinder(new SimpleAdapter.ViewBinder(){
    public boolean setViewValue(View view, Object data, String textRepresentation){
        if (view instanceof CheckBox) {
            if (data instanceof Boolean) {
                ((Checkable) view).setChecked((Boolean) data);
                return true;
            } else if (data instanceof CharSequence){
                ((TextView) view).setText((CharSequence) data);
                return true;
            } else {
                throw new IllegalStateException(view.getClass().getName() +
                               " should be bound to a Boolean or CharSequence," +
                               " not a " +  data.getClass());
            }
        }
        return false;
    }
});
SimpleAdapter のバージョン間の差異に起因する問題点
SimpleAdapter は Android 2.1 と Android 2.2 で振る舞いに違いがあります。 Android 2.1 までは Checkable に対してバインドが出来るのは Boolean 型の値だけでしたが Android 2.2 では文字列型の値もバインド可能になっています。 Android 2.2 のソースコードが手元に無いので具体的にどうなっているのかは分からないのですが、もしかすると他にも変更が加えられている可能性があります。一見便利になったともいえますが、 Android 2.2 を前提として書かれたコードは Android 2.1 ではランタイムエラーになる可能性があります。また、 Android 2.1 のコードを前提として SimpleAdaper.ViewBinder をコーディングした場合でも Android 2.2 上で実行した時に不意な動作を引き起こす可能性があります。解決策としては、 Android 2.1 または Android 2.2 のバインド処理の部分のコードを SimpleAdapter.ViewBinder の setViewValues() メソッドにそのままコピーし、戻り値は全て true で返し、バージョン間の違いを吸収してしまうことです。
実際に SimpleAdapter で ListView を作ってみる
今まではサンプルということもありサッパリ役に立たない物ばかり作ってきましたが、今回は少しは役に立つ(かもしれない)テーマに挑戦してみようかと思います。・・・とはいっても実際はシステムリソースの画像を表示するだけの単純なものです。しかし、それだけでは能がないのでチョッと背伸びをしてデフォルトでは使えない隠れシステムリソース(というほど大袈裟でもない)も表示してみようと思います。
< STEP 1 > データを作成する
データの素(もと)の収集にはリフレクション(Reflection)を用います。リフレクションはクラスそのものからフィールド値などを取り出すことが可能です。
private Field[] getFields(String className){
    Class<?> clazz = null;
    try {
        clazz = Class.forName(className);
    } catch (ClassNotFoundException e) {
        Log.e("ClassNotFoundException", e.toString());
    }
    return clazz.getFields();
}
このメソッドは「説明がしやすいように」と作成した自作のメソッドです。メソッドの引数は String 型です。この引数にはクラス名(パッケージ名+クラス名)の文字列表現を渡します。このメソッド内で行われる処理は2つだけです。 static メソッド Class#forName() で、引数で渡した文字列が表すクラスの Class オブジェクトを生成することと、そのオブジェクトの Class#getFields() メソッドを用いて Class 内の全ての Field オブジェクトを配列で受け取ることです。そして、その配列を戻り値として返して終了です。
public final classSince: API Level 1
extends Objectimplements Serializable AnnotatedElement GenericDeclaration Type
次にデータの素の Field オブジェクトから View にバインドさせる値となる「フィールド名」を Field#getName() メソッドを使い取り出します。また、そのフィールドが指し示す「値」も取り出します。今回はフィールドが全て int 型の定数( static final int )ですので Field#getInt() だけを用い値を取り出します。
private List<Map<String, Object>> getData(Field[] fields){
    List<Map<String, Object>> data = new ArrayList<Map<String, Object>>();
    for (Field field : fields){
        int id;
        try {
            id = field.getInt(null);
        } catch (IllegalArgumentException e) {
            continue;
        } catch (IllegalAccessException e) {
            continue;
        }
        Map<String, Object> map = new HashMap<String, Object>();
        map.put("id", id);
        map.put("number", "id = "  + id);
        map.put("name", field.getName());
        data.add(map);
    }
    return data;
}
この getData() メソッドも説明しやすいように自作したメソッドです。先程説明した getFields() メソッドからの戻り値を引数に渡すと、 Adapter の引数に使う List 型のデータが返ってくるというものです。中での処理は Field オブジェクトから getInt() で int 型の定数を取り出し Map に "id" というキーを使って追加しています。この値は画像の参照用IDになります。次に、そのIDの値を TextView にも表示させるために文字列に変換して Map に "number" というキーを使って追加しています。次にこれも TextView に表示させるため Field オブジェクトのフィールド名を取得して Map に "name" というキーで追加しています。これら3つの値を追加し終えたら Map を List に追加しています。この作業を Field オブジェクトの数だけ繰り返します。
これで、以下のようにすればデータの生成が可能になりました。
List<Map<String, Object>> data = getData(getFields(className));
< STEP 2 > レイアウト情報を作成する
/res/layout/layout.xml
<?xml version="1.0" encoding="utf-8"?>
<LinearLayout
  xmlns:android="http://schemas.android.com/apk/res/android"
  android:orientation="vertical"
  android:layout_width="fill_parent"
  android:layout_height="fill_parent"
  android:padding="10sp"
  >
  <ImageView
    android:id="@+id/imageview"
    android:layout_width="fill_parent"
    android:layout_height="wrap_content"
    android:gravity="center_horizontal"
    android:padding="5sp"
    />
   <TextView
    android:id="@+id/textview1"
    android:layout_width="fill_parent"
    android:layout_height="wrap_content"
    android:textSize="16sp"
    android:textStyle="bold"
    android:gravity="center_horizontal"
    />
  <TextView
    android:id="@+id/textview2"
    android:layout_width="fill_parent"
    android:layout_height="wrap_content"
    android:textSize="20sp"
    android:textStyle="bold"
    android:gravity="center_horizontal"
    />
</LinearLayout>
特に説明は要らないとは思いますが、上から ImageView、 TextView、 TextView、と縦に並べて配置しています。また、フォントのサイズとスタイルをそれぞれに換えています。それと全て中央揃えにしています。参照用のIDは上から R.id.imageview R.id.textview1 R.id.textview2 としました。
そして今回は ListView を /res/layout/main.xml にレイアウトしています。
/res/layout/main.xml
<?xml version="1.0" encoding="utf-8"?>
<LinearLayout xmlns:android="http://schemas.android.com/apk/res/android"
    android:orientation="vertical"
    android:layout_width="fill_parent"
    android:layout_height="fill_parent"
    >
    <Button
      android:id="@+id/button"
      android:layout_width="fill_parent"
      android:layout_height="wrap_content"
      />
    <ListView
        android:id="@+id/listview"
        android:layout_width="fill_parent"
        android:layout_height="wrap_content"
        />
</LinearLayout>
ListView の上にちょこんとボタンが配置されていますが、このボタンは Adapter の切り替えを行うのに使います。それぞれ参照用IDは R.id.button R.id.listview としました。
< STEP 3 > Adapter を作成する
private SimpleAdapter getAdapter(List<Map<String, Object>> data){
    String[] from = {"id", "number", "name"};
    int[] to = {R.id.imageview, R.id.textview1, R.id.textview2};
    return new SimpleAdapter(this, data, R.layout.layout, from, to);
}
これまた説明がしやすいように(という理由だけで汎用性のない)メソッドにしてしまいました。データの List インスタンスをこのメソッドの引数に渡すと。戻り値として Adapter が帰ってきます。中身の処理については何も変わったところはないので、説明は省きます。下のようにすれば一行で Adapter が返ってきます。
SimpleAdapter adapter = getAdapter(getData(getFields(className)));
< STEP 4 > ListView を作成する
今回は XML のレイアウト情報からインスタンスを取得します。
setContentView(R.layout.main);
ListView listView = (ListView) findViewById(R.id.listview);
初めに XML のレイアウト情報を Activity にセットしてから findViewById() メソッドでインスタンスを取得します。そして Adapter を ListView にセットします。
listView.setAdapter(getAdapter(getData(getFields(className))));
< STEP 5 > 切り替えボタンの生成
本来なら < STEP 4 > でお仕舞いなのですが、今回のサンプルでは Adapter の切り替えを行いたいのでボタンの作成をします。
Button のインスタンスを取得します。
final String className1 = "android.R$drawable";
final String className2 = "com.android.internal.R$drawable";
final String buttonText1 = "android.R.drawable";
final String buttonText2 = "com.android.internal.R.drawable";

Button button = (Button) findViewById(R.id.button);
button.setText(buttonText1);
最初の2行は Field の配列を取得する為に用いるクラス名の文字列定数です。次の2行はボタンに表示する文字列定数です。そして findViewById() で Button のインスタンスを取得してから buttonText1 をボタンにセットしています。続いて、ボタンが押された時の処理を行います。
button.setOnClickListener(new OnClickListener() {
    public void onClick(View v) {
        Button btn = null;
        if (v instanceof Button){
            btn = (Button) v;
        }
        if (btn != null){
            String className;
            if (btn.getText().equals(buttonText1)){
                btn.setText(buttonText2);
                className = className2;
            }
            else {
                btn.setText(buttonText1);
                className = className1;
            }
            ListView listView = (ListView) findViewById(R.id.listview);
            listView.setAdapter(getAdapter(getData(getFields(className))));
        }
    }
});
無名(匿名)インナークラスとしてOnClickListener インターフェイスを実装します。処理の中身は、押されたボタンのテキストが buttonText1 ならばテキストを buttonText2 に換え、且つ className2 のクラス名で新たな Adapter を生成して ListView にセットします。また、押されたボタンのテキストが buttonText2 であれば、テキストを buttonText1 に換え、且つclassName1 のクラス名で新たな Adapter を生成して ListView にセットします。これでボタンが押されるたびに参照するクラスが変わることになります。
以下は全体のソースです。
ListViewTest.java
public class ListViewTest extends Activity {
    public void onCreate(Bundle savedInstanceState) {
        super.onCreate(savedInstanceState);

        final String className1 = "android.R$drawable";
        final String className2 = "com.android.internal.R$drawable";
        final String buttonText1 = "android.R.drawable";
        final String buttonText2 = "com.android.internal.R.drawable";

        setContentView(R.layout.main);

        Button button = (Button) findViewById(R.id.button);
        button.setText(buttonText1);
        button.setOnClickListener(new OnClickListener() {
            public void onClick(View v) {
                Button btn = null;
                if (v instanceof Button){
                    btn = (Button) v;
                }
                if (btn != null){
                    String className;
                    if (btn.getText().equals(buttonText1)){
                        btn.setText(buttonText2);
                        className = className2;
                    }
                    else {
                        btn.setText(buttonText1);
                        className = className1;
                    }
                    ListView listView = (ListView) findViewById(R.id.listview);
                    listView.setAdapter(getAdapter(getData(getFields(className))));
                }
            }
        });
        ListView listView = (ListView) findViewById(R.id.listview);
        listView.setAdapter(getAdapter(getData(getFields(className1))));
    }
    private Field[] getFields(String className){
        Class<?> clazz = null;
        try {
            clazz = Class.forName(className);
        } catch (ClassNotFoundException e) {
            Log.e("ClassNotFoundException", e.toString());
        }
        return clazz.getFields();
    }
    private List<Map<String, Object>> getData(Field[] fields){
        List<Map<String, Object>> data = new ArrayList<Map<String, Object>>();
        for (Field field : fields){
            int id;
            try {
                id = field.getInt(null);
            } catch (IllegalArgumentException e) {
                continue;
            } catch (IllegalAccessException e) {
                continue;
            }
            Map<String, Object> map = new HashMap<String, Object>();
            map.put("id", id);
            map.put("number", "id = "  + id);
            map.put("name", field.getName());
            data.add(map);
        }
        return data;
    }
    private SimpleAdapter getAdapter(List<Map<String, Object>> data){
        String[] from = {"id", "number", "name"};
        int[] to = {R.id.imageview, R.id.textview1, R.id.textview2};
        return new SimpleAdapter(this, data, R.layout.layout, from, to);
    }
}
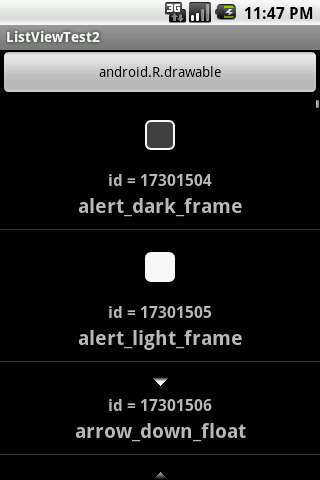
実行してみます。
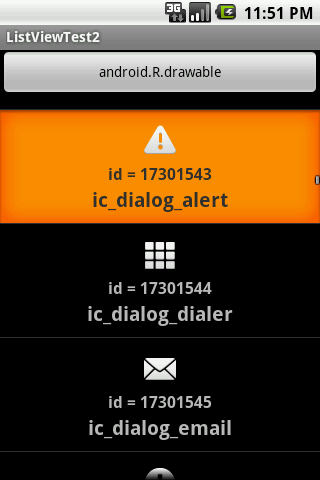
スクロールしてみます。
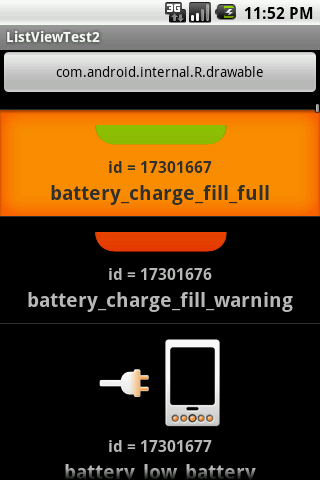
com.android.internal.R.drawable に切り替えてみます。
スクロールしてみます。 android.R.drawable では表示されなかった画像も在ります。
同じ画像もありますが、 android.R.drawable では指定されていない画像がかなりの数あることがわかります。 com.android.internal.R.drawable.* とIDを指定してもコンパイルが通りませんが、ここに表示された id = の後の番号を直接指定すれば画像を利用することが可能です。
次回は・・・
ListView の応用編をやろうかと考えていますが、ニュースねたを挟むかもしれません。それと・・・過去の分のデザイン修正もしたいなぁ・・・
脚注
1. バージョンによっては Boolean 型以外の値のバインドも可能です。詳細は「SimpleAdapter のバージョン間の差異に起因する問題点」を参照。


